Printing within WUR on Linux
 Image credit: Unknown on Google
Table of Contents
Motivation
At Wageningen University & Research the Linux Operating System is supported on a best effort principle, meaning that it is supported as far as the knowledge of Facilities and Services Information Technology (FB-IT) reaches. FB-IT is supported by their colleagues maintaining the High Performance Computing Cluster Anunna, who have a lot of knowledge about the Linux Operating System, because it’s the Operating System used by Anunna.
On the other hand Linux users are generally users, who are very independent and know how to search for and implement solutions themselves. Being one of those Linux users within WUR myself I want to share in this post, how I have set up printing on my Linux systems to use the facilities offered at Wageningen University & Research.
This post will show how to set up printing on a desk- or laptop using Linux as Operating System within WUR.
The described procedure should work on Ubuntu/Debian based Linux Operating Systems.
Download
For convenience the PostScript Printer Description (PPD) files of the printers in use at Wageningen University & Research are provided. You can save the files into the Downloads folder of your Linux desk- or laptop by right-clicking the link and selecting the option ‘Save link as…’ (IMPORTANT: DO NOT CHANGE THE FILE NAMES!):
RECOMMENDATION: Use the Postscript PPD file for the Ricoh IM C4500. On internet you can also find the PDF ppd file, but so far it does not work within WUR.
Since February 2023 the Ricoh IM C4500 is the default printer at WUR.
Printer Setup
- Open the system printer configuration tool (alternatively use console command:
system-config-printerin a terminal) as displayed below in Figure 1.

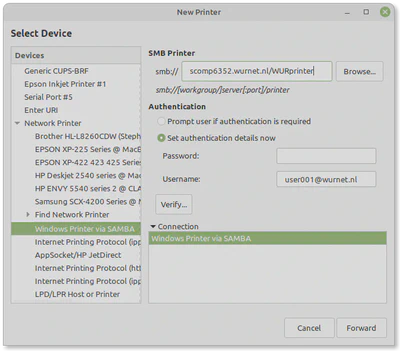
- Click the ‘+ Add’ button to configure a new printing device and a window will open as shown in Figure 2.
-
In the left column named Devices select ‘Network Printer’ > ‘Windows Printer via SAMBA’. As shown in Figure 2 fill the field SMB Printer with the address
smb://scomp6352.wurnet.nl/WURprinter(printer queue, which handles printjobs at WUR). -
Set the authentication details, as shown in Figure 2. Click the ‘Forward’ button to start the search for the printer driver as displayed below in Figure 3
user001 with your personal WUR username and make sure to add @wurnet.nl behind it. The Password provided should be the WUR Windows password for your WUR username.

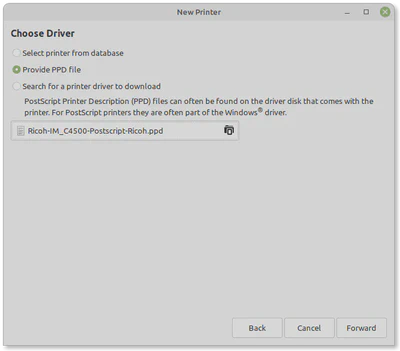
- The searching for drivers will take a little while, but none will be found. Instead a window will be presented as shown below in Figure 4 to choose the proper printer driver. Use the radio button to select ‘Provide PPD file’ and select, as advised, the
Ricoh-IM_C4500-Postscript-Ricoh.ppdfile (see Download section). Next click the ‘Forward’ button to continue.
- A window with Installable Options for the new printing device will open as shown in Figure 5. Select the settings shown and, afterwards, click the ‘Forward’ button to continue:
- Option Tray: Lower Paper Trays (SELECT THE PLURAL FORM HERE!)
- Large capacity tray: Not Installed
- Internal Tray 2: Installed
- Internal Shift Tray: Not Installed
- External Tray : Not Installed
- Finisher: Finisher SR3250
- Folding Unit: Not Installed
- PostScript: PostScript Emulation

- Next you will asked to describe the printer, as shown in Figure 6. Fill the fields as shown in the figure or with you own information:
- Printer Name: WURprinter
- Description: WUR printer Ricoh IM C4500 Postscript
- Location: Anywhere within WUR with user’s wurcard!

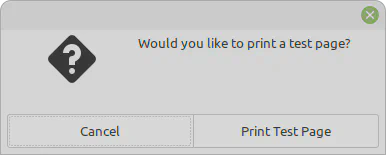
- Finish the printer setup by clicking on the ‘Apply’ button. A test print window will appear, as shown in Figure 7. Select whether you want to print a test page already or press the ‘Cancel’ button to ignore.
REMOVE SHARING OFF THE WURprinter!!
Sharing allows other users to print on your WUR account. However, you will have to print and collect the print jobs with your WUR card. This is of course very undesirable.
To prevent this behavior, right-click the WURprinter as displayed in Figure 1 and remove the tick-mark in front of Shared. This sub-menu, appearing with right-clicking the WURprinters, has other nice features such as making the selected printer your default.
Resetting your WUR Password for printing
Every 4 months you need to change the password of your WUR Account for obvious safety reasons.
This also means that you need to change your WUR password in the printer settings, when you have filled your password during the printer setup (see Printer Setup step 2.).
The are two options:
-
Delete the WURprinter and set up a new printer, as described in Printer Setup.
-
Modify the
/etc/cups/printers.conffile to match your changed WUR password:- Open a terminal (CTR+ALT+T)
- Issue the following command to shut down the Common UNIX Printing System (CUPS daemon):
sudo service cups stop- Open the
/etc/cups/printers.conffile as adminstrator in a text editor, e.g.
sudo xed /etc/cups/printers.conf- Modify the line:
DeviceURI smb://user001%40wurnet.nl:password@scomp6352.wurnet.nl/WURprinter- In this line
%40wurnet.nlrepresents@wurnet.nl, where the@is encoded as hexadecimal ASCII character (see ASCII table).user001will be displaying your own personal WUR username. The part between:and@represents your password, in which special characters are encoded as hexadecimal ASCII characters. Modify the password part to match you new password.- e.g. new password: qu!ck4L!9H+2 (very strong password), needs to be provided in
printers.confas qu%21ck4L%219H%2B2
- e.g. new password: qu!ck4L!9H+2 (very strong password), needs to be provided in
- Save the modified
/etc/cups/printers.conffile and exit the text editor - Restart the CUPS daemon:
sudo service cups start
CUPS issue: no color prints
Linux distributions generally use the Common Unix Printing System (CUPS) as the default printing daemon.
In some versions of CUPS 2.4.x there is a bug, which causes printers to be added default in monochrome mode. Even when you indicate that you want to print in color, the output will be monochrome. Check your CUPS version in a browser using localhost:631 as URL.
Perform the following steps to fix this problem:
- Open a terminal (CTRL+ALT+T) and log in as administrator using the console command:
sudo -i
- Excute the following command, where
<printername>reflects the name of your printer (if you followed Printer Setup above,<printername>will beWURprinteras set in step 7.):
lpadmin -p <printername> -o print-color-mode-default=color
-
Exit out of administrator mode using the
exitcommand. -
Close the terminal, if desired, with another
exitcommand.
Maikel Verouden, Ph.D.
Researcher | Lecturer | IT & Organization contact person
My research interests include Statistics, Teaching and programmable matter (statistical software).