Custom Anaconda installation on a WURclient computer
 Image credit: Panos Sakalakis on Unsplash
Table of Contents
Motivation
A WURclient desktop or laptop at Wageningen University & Research is not a standard Windows 11 computer. WURclients use Windows 11 Enterprise, which has been modified by Facilities and Services Information Technology (FB-IT) among others with respect to installation rights for security reasons.
Classic WURclient desktops and laptops at Wageningen University & Research can install RStudio from the Software Center created by the IT department, which is launched by clicking on Start and selecting the “Software Center” tile. Modern WURclient desktops and laptops use the “WURAppStore” instead. The available version of Anaconda Python (Anaconda3) in Software Center is Anaconda Python 2025.06-0, whereas in the WURAppStore it is named Anaconda3 2025.06-0.
This version of Anaconda Python was packaged for educational purposes. Only once per year a new version of Anaconda Python is released in Software Center (for Classic WURclients) and WURAppStore (for Modern WURclients, and course software for students).
Many users, however, would like to use a newer version of Anaconda Python than the one in Software Center. At the moment of writing this post the latest version of Anaconda Python released on the Anaconda Repository Archive is Anaconda3 version 2022.10 containing Python 3.9.13 (released on 2022-10-17). The post has been updated, with the exception of the screenshots, to Anaconda3 version 2025.06-1 containing Python 3.13.5 (released 2025-07-18).
Prerequisite
To be able to perform a custom installation of R you need to have POWER USER RIGHTS on the WURclient desktop or laptop.
To see whether you possess these rights, right-click any icon (except Recycle Bin or WUR HELP) on the desktop. When the opened menu contains the option ‘WUR - Run with administrative rights’ (seventh or eighth from the top), it means you have power user rights on that particular desktop or laptop.
Uninstall a previously installed Anaconda Python version
Before performing a new custom installation of Anaconda it is recommended to uninstall a previously installed version.
Here two procedures are described, follow the one that fits your needs:
In case you have no version of Anaconda installed on your WURclient desktop or laptop you can proceed to the section Custom Anaconda installation.
Installed from Software Center
If you previously installed Anaconda Python from Software Center, then to remove Anaconda Python reopen the Software Center by clicking on Start and next click on the Software Center tile. If for some reason you lack this tile in your start menu, just type ‘Software Center’ and it will appear in a search results window in your Windows task bar.
In the left column of Software Center navigate to “Installation Status”. Select the installed Anaconda Python version and click on the green button bearing the text “Uninstall”. This will start the removal of the software. You will be informed by the Software Center, when the software has been uninstalled.
If you have not installed another version of Anaconda Python, either via Software Center or via a custom installation, your computer should now be lacking a functioning Anaconda Python installation. Continue with the section Custom Anaconda installation to perform a new custom installation of Anaconda.
When you do still have a working Anaconda Python installation on your WURclient computer, return to Uninstall a previously installed Anaconda version and follow the procedure applicable to your situation.
Installed previously as a custom installation
Let’s assume you previously installed Anaconda3 version 2021.11 on a WURclient computer (either a desktop or laptop) by following the steps for a custom installation of Anaconda as described in this post. For a newer version of Anaconda the steps are the same, but names of folders may differ.
To uninstall Anaconda perform the following steps:
- Open a File Explorer and navigate to the folder
C:\MyPrograms\Anaconda3. Right-click the fileUninstall-Anaconda3.exeand select ‘WUR - Run with administrative rights’ as displayed in Figure 1 below.

- The uninstaller will start as shown below in Figure 2. Click the ‘Next >’ to proceed.

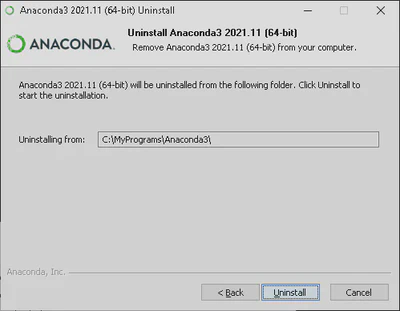
- The uninstaller proceeds to the next screen, as shown in Figure 3, displaying the folder from where Anaconda3 will be uninstalled. Click the ‘Uninstall’ to proceed.
- Once the uninstallation has completed, a message of success will be display as shown below in Figure 4. Click the ‘Next >’ button to continue.

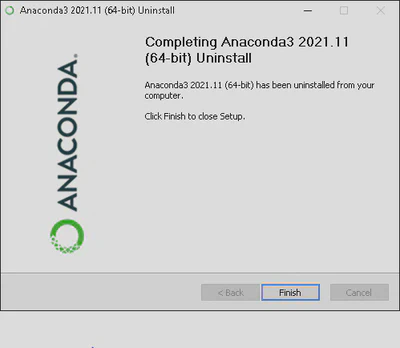
- To finish off the uninstallation click the ‘Finish’ button as displayed in Figure 5.
If you have not installed another version of Anaconda Python, either via Software Center or via a custom installation, your computer should now be lacking a functioning Anaconda Python installation. Continue with the section Custom Anaconda installation to perform a new custom installation of Anaconda.
When you do still have a working Anaconda Python installation on your WURclient computer, return to Uninstall a previously installed Anaconda version and follow the procedure applicable to your situation.
Custom Anaconda installation
To prepare the custom Anaconda installation a couple of folders need to be created prior to the installation of Anaconda. Perform the following steps exactly as described:
-
Search for the Command Prompt App by typing
cmdin the search field of the Windows task bar. -
The left part of the search results will show the Command Prompt App as best match and it will be highlighted in blue. Click on
Open file location(third from the top) in the right part displaying the options for the Command Prompt App. -
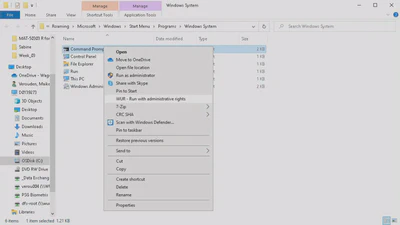
A File Explorer window will open with the shortcut to Command Prompt highlighted in blue. Right click the Command Prompt shortcut and select ‘WUR - Run with adminstrative rights’ as shown in Figure 6 below.
- The Command Prompt application will open, as shown in Figure 7, on the folder
C:\Windows. The top of the window shows that the Command Prompt application is used in Administrator mode (WARNING: BE CAREFULL!!).

- Create the directory
C:\MyPrograms. In case the directory already exists, the messageA subdirectory or file C:\MyPrograms already exists.will appear. To create the indicated folder copy (CTRL+C), paste (CTRL+V) the following line behind the prompt and press return (Enter) to execute it:
mkdir C:\MyPrograms
- Next create the directory
C:\MyData. This is done by copying (CTRL+C) the following line, pasting (CTRL+V) it behind the prompt and pressing return (Enter) to execute. In case the directory already exists, the messageA subdirectory or file C:\MyData already exists.will appear.
mkdir C:\MyData
- To close the Command Prompt application type
exitand press return (Enter) to execute.
Download
At the time this post was written, the latest release of Anaconda3 was version 2022.10. It has been updated to the latest release version 2025.06-1 of Anaconda3.
The installer for Windows 10/11 can be downloaded directly from this link: Anaconda3 2025.06-1 for Windows (ca. 914.6 MB, 64-bit).
Installation
For newer versions of Anaconda3 than 2022.10 the steps described below are the same and still correct, but start with a newer version of the downloaded executable installer file of Anaconda3. The screenshots in this post have not been updated. Therefore, what you see during your installation will differ with respect to the version number shown in the screenshots.
-
Right-click the downloaded file Anaconda3-2025.06-1-Windows-x86_64.exe and select ‘WUR - Run with administrative rights’. This file will most likely reside in your Downloads folder of your user account.
-
If asked for, allow to install the software on your computer.
-
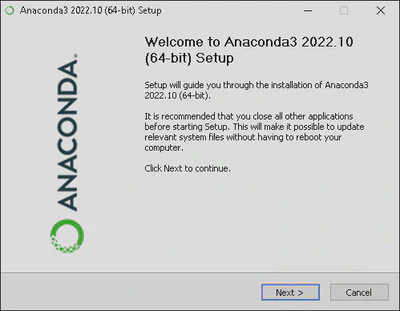
After the installer has started, a first selection window will appear as displayed below in Figure 8. Click the ‘Next >’ button to proceed.
- The installer will now display the license agreement for installation of Anaconda3, as shown below in Figure 9. Click on the ‘I Agree’ button to agree to the terms.

- After agreeing to the license terms, the Anaconda3 setup will ask for whom you wish to install for, as displayed in Figure 10. Select the radio button ‘All Users (requires admin priveleges)’ and click on the ‘Next >’ button to proceed.

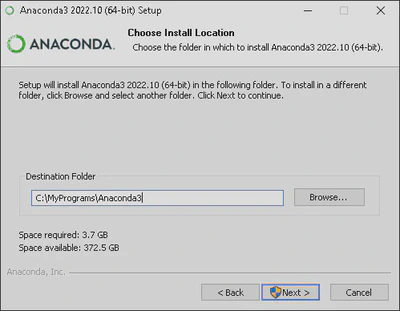
- Having selected the installation type, the Anaconda3 setup will request for an installation location as shown in Figure 11. Change the destination location to
C:\MyPrograms\Anaconda3, to match Figure 11, by typing the destination path directly into the text field displayed (currently showingC:\ProgramData\Anaconda3). Click on the ‘Next >’ button to continue.
- After selecting the installation location folder the Advanced Installation Options will appear, as displayed below in Figure 12. Leave the selection as displayed and click on the ‘Install’ button to start the installation.

- Once the installation has been completed Figure 13 will be displayed. Click on the ‘Next >’ button to continue.

- Next the Anaconda3 Setup will show some information on how great Anaconda works with DataSpell as shown in Figure 14. Click the ‘Next >’ button to proceed.

- Finally the Annaconda 3 Setup shows that installation has been completed as displayed in Figure 15. Remove the tick marks from the boxes in front of ‘Anaconda Distribution Tutorial’ and ‘Getting Started with Anaconda’, unless you want to display this information, click the ‘Finish’ button to finish off the installation and close the Anaconda3 Setup.

Before using Anaconda check out the configuration instructions below carefully.
At least do the part on Changing the Default Startup Working Directory!
Configuration Anaconda3
Changing the Default Startup Working Directory
When starting JupyterLab or Jupyter Notebook from within Anaconda Navigator the default working directory on a WURclient will be C:\User\user001, where user001 will display your own WUR username. This is not a very smart location to store your Jupyter Notebook files (files with the *.ipynb extension), because this a local storage location without backup.
Most users would like to store their documents in M:\My Documents, which is an internal mapping to \\WURNET.NL\Homes\user001\Documents. Files stored in your M:\-drive are backed up by FB-IT and, therefore, provide a much safer storage environment.
To change the default start up working directory perform the following steps:
-
Open the Start Menu and navigate to ‘Anaconda3 (64-bit)’.
-
Either start ‘Anaconda Powershell Prompt (Anaconda3)’ or ‘Anaconda Prompt (Anaconda3)’. A window will open displaying the prompt as
(base) PS C:\>for ‘Anaconda Powershell’, or(base) C:\>for ‘Anaconda Prompt`. -
Type the command shown below behind the prompt and press return (Enter) to execute:
jupyter notebook --generate-config
-
A message stating:
Writing default config to: C:\Users\user001\.jupyter\jupyter_notebook_config.py, whereuser001will display your own WUR username, is printed in the window. Typeexitand press return (Enter) to close the prompt window. -
Open a File Explorer window and navigate to the created file
C:\Users\user001\.jupyter\jupyter_notebook_config.py. You may have to change the settings in File Explorer to show the hidden items (File Explorer top menu bar ‘View’ and place a tick mark in front of ‘hidden items’). -
Right-click the file
jupyter_notebook_config.pyand select ‘Open with’. Remove the tick mark in front of ‘Always use this app to open .py files’ and select e.g. ‘Notepad’. If you do not see ‘Notepad’, click on ‘More apps’. -
The file
jupyter_notebook_config.pywill open in the ‘Notepad’ application. Navigate to line 450 (pressCTRL+Gand enter 450). Remove the#and whitespace character in front ofc.NotebookApp.notebook_dirand replace''with'M:\My Documents'. Save the document by pressCTRL+S. Lines 448-450 should now look like this:
## The directory to use for notebooks and kernels.
#  Default: ''
c.NotebookApp.notebook_dir = 'M:\My Documents'
- Make sure you have saved your changes in the file
jupyter_notebook_config.pyand close the ‘Notepad` application.
You have now changed the default start up working directory permanently.
Upgrading Anaconda Navigator (Anaconda3)
After starting Anaconda Navigator, sometimes you will see that a newer version of the Navigator is available. In the top right corner this is indicated as displayed in Figure 16

However, having started Anaconda Navigator from the Start Menu as regular user, you will be prompted to enter the administrator username and password. This is a problem, because you are a Power User and not an Administrator.
To be able to upgrade Anaconda Navigator you have to start the application with ‘WUR - Run with adminstrative rights’. This can be done by following these steps:
-
Open the Start Menu and navigate to ‘Anaconda3 (64-bit)’
-
Right-click on the ‘Anaconda Navigator (Anaconda3)’ start item, select ‘More’ > ‘Open file location’. This will open a File Explorer window displaying the shortcuts to start items of ‘Anaconda3 (64-bit)’.
-
Again right-click on the start item “Anaconda Navigator (Anaconda3)” in the File Explorer windows and select ‘WUR - Run with adminstrative rights’
Now you will be able to upgrade Anaconda Navigatore by clicking on ‘Upgrade Now’, as displayed in Figure 16.
Add a R kernel
After installing Anaconda3 only the Python kernel is present. To add a R kernel for use inside Jupyter Notebook or JupyterLab perform the following steps:
-
Open the Start Menu and navigate to ‘Anaconda3 (64-bit)’.
-
Start ‘Anaconda Powershell Prompt (Anaconda3)’. A window will open displaying the prompt as
(base) PS C:\>. -
Navigate to where
R.exeis located. Let’s assume you have R v4.2.1 installed, either via Software Center or via Custom installation on a WURclient. For other R versions than 4.2.1 do not forget to change the R version number!-
For a installation via Sofware Center use the following commands:
cd C:\Program Files\R\R-4.2.1\bin\ .\R.exe # At the R prompt, indicated by > install.packages("IRkernel") IRkernel::installspec() q() Save workspace image? [y/n/c]: n # back at the powershell prompt, indicated by (base) PS C:\> exit -
For a Custom installation on a WURclient use the following commands:
 cd C:\MyPrograms\R\R-4.2.1\bin\
 .\R.exe
 # At the R prompt, indicated as >
 install.packages("IRkernel")
 IRkernel::installspec()
 q()
 Save workspace image? [y/n/c]: n
 # back at the powershell prompt, indicated by (base) PS C:\>
 exit
-
Now the R kernel will be available in Jupyter Notebook and JupyterLab.
Add a Julia kernel
After installing Anaconda3 only the Python kernel is present, unless you already did Add a R kernel . To add a Julia kernel for use inside Jupyter Notebook or JupyterLab perform the following steps:
- Open Julia on your WURclient. A window will open and you will see the prompt displayed as
julia> - Type
]and the prompt will change into(@v1.8) pkg>. This under the assumption that you have Julia v1.8.2 or later installed. For other versions of Julia the version number for package management will differ. - Type the command
add IJulia. This will install a lot of packages and make the Julia kernel available in Jupyter Notebook and JupyterLab. - Close the Julia package manager by pressing the BACKSPACE key on your keyboard.
- Type
exit()to close Julia.
Now the Julia kernel will be available in Jupyter Notebook and JupyterLab.
Maikel Verouden, Ph.D.
Researcher | Lecturer | IT & Organization contact person
My research interests include Statistics, Teaching and programmable matter (statistical software).