Anaconda (re-)installation on macOS
 Image credit: Maxim Hopman on Unsplash
Table of Contents
Motivation
Whether working, or studying, everybody uses various sorts and types of software on their computer. Around 34 courses at Wageningen University & Research use Anaconda Python as software in their course, e.g., SSB30806 Modelling in Systems Biology, and SSB32806 Introduction to Systems and Synthetic Biology.
In the text some symbol combinations are used for shortcuts, the following table explains the meaning of these symbols in relation to specific keys on your keyboard. To use the shortcuts press the keyboard keys simultaneously, e.g. ⇧⌘A means ⇧+⌘+A.
| Icon | Keyboard Meaning | Icon | Keyboard Meaning | |||
|---|---|---|---|---|---|---|
| ⌘ | command | ⇪ | caps lock | |||
| ⌥ | option (or alt) | ↩ | carriage return (return/enter) | |||
| ⌃ | control | ⌫ | delete/backspace | |||
| fn | function | ⌦ | forward delete (fn + ⌫) | |||
| ⇧ | shift (either left or right) | ⎋ | escape |
Complete removal of a previous Anaconda installation on macOS
If you have previously installed Anaconda and wish to re-install the latest version or your current installation is not working as you expect, you first need to delete everything related to Anaconda. In macOS a complete removal is somewhat complicated, but doable if you follow all steps precisely as provided in this post.
For the complete removal of everything related to Anaconda the Terminal application will be used. In your Finder > Applications (shortcut: ⇧⌘A) there is a Utilities folder as depicted in Figure 1 below.
Within this Utilities folder, which can be directly accessed by using the ⇧⌘U shortcut, the Terminal application is contained. The icon in Figure 2 shows what the Terminal application looks like in the Finder > Applications > Utilities folder.
The Terminal application can also be started via Lauchpad under the ‘Other’ group.
Steps for a complete removal of Anaconda on macOS:
-
Start the Terminal application. The terminal console prompt, where the commands will be entered, is depicted by a
%or a$sign. Which sign is shown, depends whether your default shell is zsh (%sign) or bash ($sign). -
Install the
anaconda-cleanpackage:conda install anaconda-clean -
Then, run
anaconda-cleanwith the argument--yesto remove all those files and directories without being asked to confirm each one:anaconda-clean --yes
anaconda-clean --yes creates a backup of all files and directories that might be removed in a folder named .anaconda_backup in your home directory. Also note that anaconda-clean leaves your data files in the AnacondaProjects directory untouched.
-
Remove all Anaconda directories from your system by sequentially executing the following commands:
rm -rf /Applications/Anaconda-Navigator.app sudo rm -rf /opt/anaconda3 rm -rf ~/.anaconda_backup -
Sequentially open
.bash_profile,tcshrc,.xonshrc, and.zshrcin TextEdit and delete the section starting with# >>> conda initialize >>>and ending with# <<< conda initialize <<<.
In a terminal this is done, e.g. for .bash_profile, with open -a TextEdit .bash_profile. Use the shortcut ⌘S to save the file, and close the file with the shortcut ⌘Q.
Download
At the time this post was written, the latest release of Anaconda was version 2022.10 containing Python 3.9.13. It has been updated to the latest release version 2025.06-1 of Anaconda containing Python 3.13.5.
For newer versions of Anaconda than 2022.10 the steps described below are the same and still correct, but start with a newer version of the downloaded installer package file of Anaconda. The screenshots in this post have not been updated. Therefore, what you see during your installation can (and probably will) differ with respect to the version number shown in the screenshots.
For macOS there are two downloads of Anaconda available on the Anaconda Repository Archive. To see which version you need click on in the menu bar and select ‘About This Mac’.
NOTE: If you are using a mac with the newest M1, M2 or M3 processor, download the Apple Silicon arm64 build!
Download Anaconda for your specific version of macOS using one of the following links:
- For an Intel processor based mac: Anaconda3 2025.06-1 (ca. 800.3 MB, Intel 64-bit build)
- For a M1/M2/M3/M4 processor based mac: Anaconda3 2025.06-1 (ca. 781.3 MB, ARM 64-bit build)
Installation
For installing Anaconda on macOS follow these steps:
-
Open the downloaded file, either Anaconda3-2025.06-1-MacOSX-x86_64.pkg, or Anaconda3-2025.06-1-MacOSX-arm64.pkg depending on the processor in your mac (as explained above). This file will most likely reside in Finder > Downloads (shortcut: ⌥⌘L). The file can more easily be found by switching into List view (shortcut: ⌘2). To switch to Icon view use the shortcut: ⌘1.
-
The installler will start by displaying a message as shown in Figure 3. Click ‘Allow’ to let the package determine if the software can be installed.

- When the package can be installed the welcome screen of the Anaconda3 Installer will be displayed as shown in Figure 4. Click the ‘Continue’ button to proceed with the installation.

- Now the Read Me for the software to be installed as displayed in Figure 5 below. Click the ‘Continue’ button to proceed.

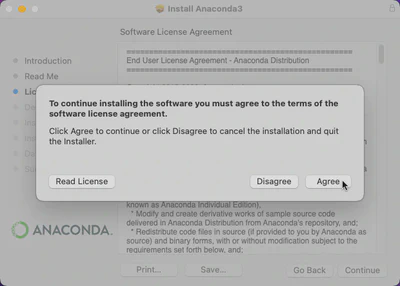
- Right after the Read Me a Software Licence Agreement will appear as shown in Figure 6. By clicking the ‘Continue’ button you will be asked to agree with this software licence agreement as diplayed below in Figure 7. Click on ‘Agree’ to proceed.

- The installer will let you select how you want to install the software as shown in Figure 8. It is recommended to leave the settings as provided and click the ‘Continue’ button.

- After selecting the installation type the installer asks to provide an installation destination as displayed in Figure 9. Also here it is recommended to leave the default settings and click the ‘Install’ button.

- Your system will ask to either provide the password (see Figure 10) or use the fingerprint scanner to confirm the software installation.

- Your system may ask you to allow access to your Downloads folder, as shown in Figure 11. Click the ‘OK’ button to grant access to the Downloads folder.

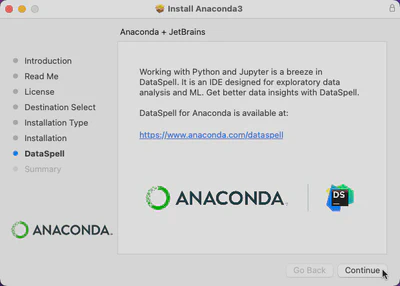
- Once the files have been installed the Anaconda3 installer will display a message about DataSpell as shown in Figure 12. If your interested visit [https://www.anaconda.com/dataspell]. To proceed with the installer click the ‘Continue’ button.
- After the DataSpell message the Anaconda3 installer has reached the end (see Figure 13). Click on the ‘Close’ button to finalize the installer and close the installer.

Congratulations 😆, you now have Anaconda3 2025.06-1 containing Python 3.13.5 installed on your mac!
Before actively using Anaconda, some configuration may be required. The configuration is described in the next section.
Configuration Anaconda3
Upgrading Anaconda Navigator (Anaconda3)
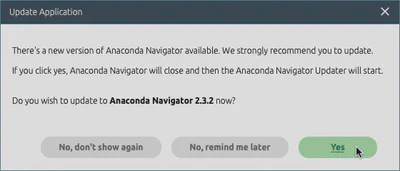
When starting Anaconda Navigator from your Applications folder, the Navigator may open displaying the message shown in Figure 14.
To upgrade Anaconda Navigator follow these steps:
-
Click on ‘Yes’ as shown in Figure 14.
-
Continue the procedure as indicated on your display to perform the update of Anaconda Navigator.
Add a R kernel
After installing Anaconda3 only the Python kernel is present. To add a R kernel for use inside Jupyter Notebook or JupyterLab perform the following steps:
-
Open the Terminal application as described above in Complete removal of a previous Anaconda installation on macOS.
-
Start R by typing
Rand press return ↩ to execute. -
Add the R prompt type the following commands sequentially and after each command press return ↩ to execute. Below version 4.2.1 of R is assumed, do not forget to change the R version number when you are using a different version of R!
## At the R prompt, indicated by > install.packages("IRkernel") IRkernel::installspec() q() # Question in R: Save workspace image? [y/n/c]: n -
Close the Terminal application by typing
exitand press return ↩ to execute.
Now the R kernel will be available in Jupyter Notebook and JupyterLab.
Add a Julia kernel
After installing Anaconda3 only the Python kernel is present, unless you already have added a R kernel. To add a Julia kernel for use inside Jupyter Notebook or JupyterLab perform the following steps:
-
Open the Terminal application as described above in Complete removal of a previous Anaconda installation on macOS.
-
Start Julia by typing
juliaat the terminal prompt and press return ↩ to execute. Once Julia has started, you will see the prompt displayed asjulia>. -
Type
]and the prompt will change into(@v1.8) pkg>. This under the assumption that you have Julia v1.8.2 or later installed. For other versions of Julia the version number for package management will differ. -
Type the command
add IJuliaand press return ↩ to execute. This will install a lot of packages and make the Julia kernel available in Jupyter Notebook and JupyterLab. -
Close the Julia package manager by pressing the BACKSPACE key on your keyboard.
-
Type
exit()and press return ↩ to execute, in order to close Julia. -
Close the Terminal application by typing
exitand press return ↩ to execute.
Now the Julia kernel will be available in Jupyter Notebook and JupyterLab.
Maikel Verouden, Ph.D.
Researcher | Lecturer | IT & Organization contact person
My research interests include Statistics, Teaching and programmable matter (statistical software).